- 1. How to confirm my Heimdal Security account and activate it?
- 2. How to create a group policy?
- 3. How to download the Thor Agent on my system?
- 4. How to Launch My Thor Agent?
- 5. How to block applications?
- 6. How to setup proxy settings for systems over a LAN (offline/online)?
- 7. How to block some websites?
- 8. How to unblock Important Work Related Files that are saving my data but being blocked by the agent?
- 9. How to check the License Expiry of Thor Agent
1. How to confirm my Heimdal Security account and activate it?
- Open the email that you received from Heimdal
- Click on the Confirm Account button (Fig. 1)
- Write down the current password which is Heimdal@7700.
- Select your new password according to you
- Download Google Authenticator from Play Store (for Android) or AppStore (for iOS) and scan the given QR code, in case of 2-Factor Authentication (2FA) enabled, otherwise go to step 7
- After scanning QR it will generate a specific code write down on it with in a time cycle of 30 seconds, after every 30 seconds a new code will be generated and only that new code will be required to enter after your credentials.
- Then click on the submit button (Fig. 2)


After submitting the form, you will be required to log in the console, if you have 2FA enabled, you will be required to enter the current generated code in the Google Authenticator application, make sure you entered the latest code in given time span of 30 seconds.
2. How to create a group policy?
Although policies are created as per user requirements, but for ensuring standard security, you can go through following steps:


Remaining Settings for 3rd Party Application

Remaining Settings for Microsoft Update


Remaining Settings for Next-Generation Antivirus


Remaining Settings for Firewall Management


Must have Blocking Rules in Application Control

3. How to download the Thor Agent on my system?
- After logging in the console, press on the GUIDE button

- Then click on the Download and Install
- Then click on the Heimdal Version

- Your agent will be download after clicking on I Agree.

When your agent is download in your system open it and this window will appear
- click on the button Agree

- Click on the Next button

- Then click again on the Next button

- Go to your console and click on the section Your HS Activation Key
- Copy the Activation Key

- Choose Thor HOME / ENTERPRISE, paste your key on the given box, and press Activate
This will Install Thor Agent in your system.
4. How to Launch My Thor Agent?
After installation of the Thor Agent, in order to launch it you will go through following steps:
- Click on the Thor Icon.

- Your Thor Agent will be shown like this window.

5. How to block applications?
Blocking application will be covering two methods;
- Via Intercepted Applications
- Via Manually Adding Applications in the blocklist
Blocking Intercepted Applications
Intercepted applications are monitered by the agent installed in your system(s). Once they are executed aftre agent installation, each execution of all applications in your system is being monitored. In order to block application via this module, you will sign in to the Heimdal Security dashboard and go through following steps.
- Press on the Active Client
- Click on the 3 dots ( ⋮ )
- Click on the View Application

- Select the application that you want to block
- Then click on the Block button

- Global rule means that the application will be blocked in all policies that you created.
- Custom rule enables you to select a specific policy on which you want to apply your Blockage Rule
- To apply on a specific policy, click on the radio button Custom Policy Global Block Rule
- Select a policy
- Enter the priority you want to set (1 – 2000)
- Click on the Yes button

In order to check the location where the blocked applications are shown, open your dashboard
- Click on Privileged Access
- You can see the blocked applcations in the table given below
Blocking Applications Manually
In order to block applications manually, you have to go to following steps after signing in to the Heimdal Security dashboard:
- Click on SETTINGS

- Click on the particular Group Policy on which you want to apply an application block rule.

- Click on Privilege Access Management

- Under the section of Privilege Access Management, click on Application Control
- Click on ADD NEW RULE

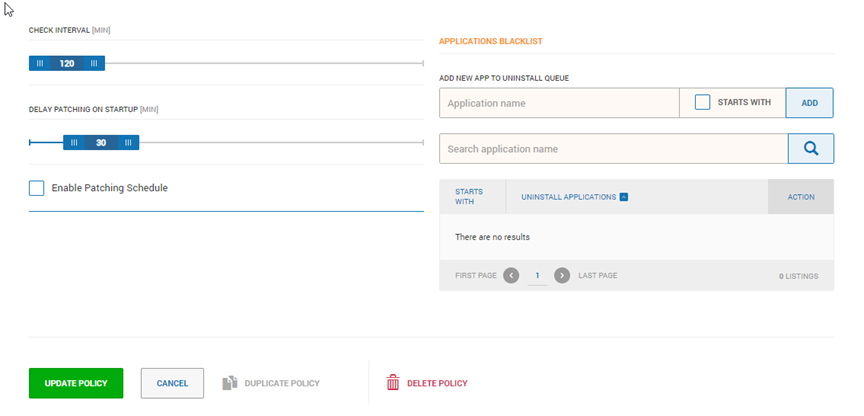
After clicking on ADD NEW RULE a form will appear in which you have to enter the required details for setting an application blockage rule, those details are mentioned as follows:
- Select RULE TYPE – Which will define which method will be used in order to block an application, for example, rule type ‘Software name’ is selected in the screenshot given below.
- In the RULE VALUE, you will enter the value corresponding to the RULE TYPE you have selected in the previous step, for example, the rule value entered over here is the software name (without its extension).
- Setup priority given to the rule (1 – 2000), make sure you don’t repeat the priority that is given to another blockage rule.
- Select the action from the dropdown list, in this case you are supposed to select Block
- After entering the above required details, click on ADD RULE

After clicking on ADD RULE the form in which you just added required details, will disappear, and a list will appear below the search box, in which you will see all the blockage rules that you have added so far.

Please don’t forget to click on UPDATE POLICY for applying latest created blockage rule in the particular group policy.
6. How to setup proxy settings for systems over a LAN (offline/online)?
In order to setup manual proxy settings for machines in such cases, we can create a new policy to apply over systems over a LAN.
After logging in your Heimdal Dashboard, please go through the following procedure.
- Click on Settings

- Click on Create New Policy

- A form will appear in which you will add required details for policy creations. Then click on the radio button captioned as Manual Policy

- After clicking on the radio button, enter the required details consisting of “HOST ” and “PORT” and other details consisting of “DOMAIN”, “USERNAME”, and “PASSWORD” (if required)

- After setting up the policy settings, please click on the button Create Policy
Don’t forget to “Enable” and “Apply” the created policy on the Clients (system/phones) mentioned on the page “Active Clients.”
7. How to block some websites?
- After signing in to the dashboard of Heimdal Security, click on Settings located on top right header of the console.

- Select the policy in which you require to block websites.

- After getting into the selected policy, choose Threat Prevention from the panels given under your selected policy.
- Make sure DarkLayer Guard™ is selected.

- Enter the domain name e.g., somedomain.com in the pointed text box to get it blacklisted and press ADD.

The domain will be added in the blacklist.
- In order to enable block websites via categories, check the checkbox located by the text “Enable Block by Category”.

- Select categories according to your requirements and click on Update Policy
- For setting time span consisting of days of the month or weekly schedule, the option is mentioned over here:

8. How to unblock Important Work Related Files that are saving my data but being blocked by the agent?
If some file is being blocked by the Heimdal Antivirus, and their actions are considered as Encryption, please go through the following steps:

- Select the policy that is applied on your respective systems, PCs, laptops, servers, etc.
- Click on the panel Endpoint Detection
- Click on Ransomware Encryption Protection.
- Type the name of file with .EXE and click add.
- Click on ADD
After clicking on the ADD button, you will see the added fill will appear in the list below. Then all you need to do is to Update Policy on the console, launch the agent present in the respective machine, and under the heading of THOR Foresight click on SCAN ANYWAY.

9. How to check the License Expiry of Thor Agent
In case you need to know when you Thor Agent’s license(s) will expire, you have to go through the following steps after logging in your dashboard:

- Click on Guide button on the left panel.
- Click on Your HS Activation Key

- Your HS Activation Key, Agent’s Expiration date and Status will be shown on the page below